
Excerpts from the blog on ‘How to Conduct A Complete Google Ads Audit’ by Oliver Wood of DigitalMonopoly.
Audits are absolutely essential for Google Ads accounts.
Performing a comprehensive audit provides invaluable insight that can uncover hidden opportunities and boost the performance of your campaigns. Your campaigns could already be generating sales. But it is still strongly recommended to conduct audits every six months at the minimum.
Here we look at how to conduct a complete audit for your Google Ads account.
I. Review Targeting Settings
What makes Google Ads such an effective platform is the level of control that advertisers have. If your services are only available within a certain region, you can adjust the geotargeting of your ads accordingly. Likewise, if you sell to a global audience you could expand your reach by targeting more countries.
But even one small mistake could severely impact your campaigns.
Login to your Google Ads account, then go into one of your campaigns and click the Settings tab.
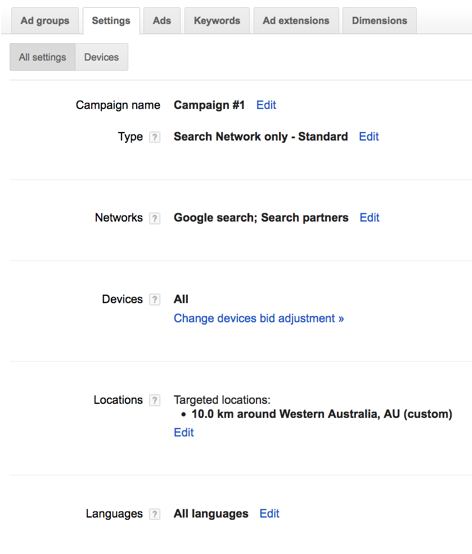
Here are key items to check:
A. Type
Type determines where your ads are displayed and the settings available. For example, you could choose to have your ads display on only the Search Network. Additional options including creating call-only ads.
B. Network
Selecting the option to include search partners lets you display ads on the Google Search Network including Search, Play, Shopping, and Maps. Showing your ads to the entire network lets you target even more customers.
C. Devices
By default your ads will display on desktop and mobile devices. Clicking on ‘Change devices bid adjustment’ lets you adjust the bids of your mobile ads and rank in a higher position. Before adjusting this option, be sure that your site is optimised for mobile devices.
D. Locations
If your customers are primarily local, it doesn’t make sense to display ads on the other side of the country. Under Locations, click on the Edit link to select a location to target. You can narrow your results even further with radius targeting.
Review targeting settings for each campaign to ensure everything is in order.
II. Evaluate Ad Group Relevancy
A common pitfall is to add as many keywords as possible to an ad group.
Google assigns a Quality Score to your campaigns which is a rating of the quality and relevance. The score affects how much you pay and even your ad positions. So ad groups should only contain about 15 to 20 keywords to keep them highly targeted.
Why does this matter?
Because each keyword in an ad group triggers the same ad.
If the product or services you sell have distinguishing features, you should put them in their own group. Review your ad groups and keep all related keywords together. That way you can create focused ad copy that reflects what the searcher is looking for.
III. Review Keyword Match Type Settings
Keyword match type lets you better control how your ads are triggered.
Here is an overview of the different options:
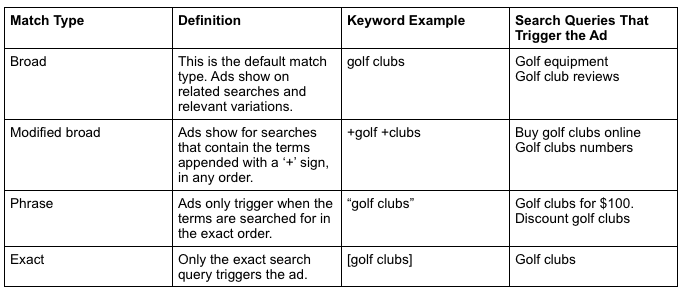
Each keyword match type serves a different purpose.
But a common mistake is running on ads on the same match type. So your ads could be triggered by search queries with completely different intentions. This not only results in poor click through rates, it also leads to lower Quality Scores. Similarly, selecting only exact match type for your keywords can limit your reach.
Review the match type settings for your keywords and select the appropriate setting. You can also browse through the Search Terms Report to see which keyword variations are triggering your ads.
IV. Assess Negative Keywords List
Every search query has different intentions.
And some will only waste your ad spending.
Negative keywords prevent your ads from showing for untargeted keywords. Adding them to your lists keeps your campaigns more targeted and reduces costs. If your store only sells pet products, you wouldn’t want your ads to display for queries such as “pet groomers”.
You can add or view negative keywords on the main campaign page by clicking on the Keywords tab and Negative keywords.
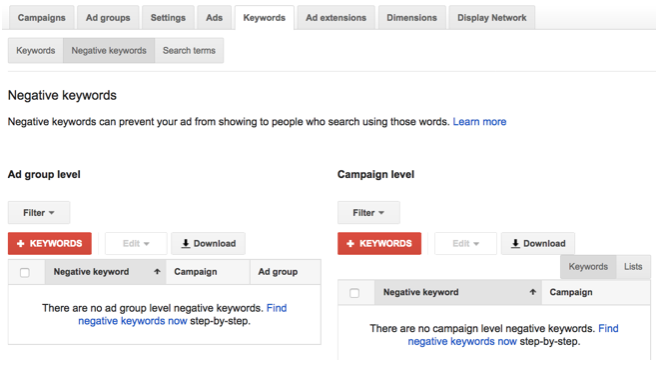
Note that you can add negative keywords to the ad group and campaign level.
Review your negative keywords list to see that they are still appropriate. If your business has added any new products or services, you wouldn’t want to be accidentally blocking any views. Alternatively, you can also browse through the Search Terms Report to see what keywords are triggering your ads and add any irrelevant queries to your negative keyword list.
V. Check Your Conversion Tracking Code
Tracking conversions is absolutely crucial so you can accurately measure campaign performance. If a campaign is doing poorly in terms of conversions, you could pause or stop it altogether. And if a campaign has a high conversion rate, you could allocate more funds to it.
Check that you are properly tracking conversions. In your Google Ads account, click on the Tools link located at the top. Then click on Conversions from the dropdown list and click on the red +Conversion button.
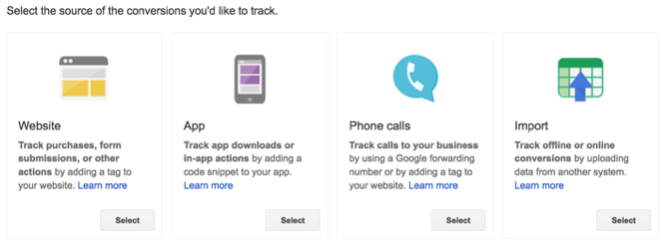
Select the appropriate option and walk through the steps. Remember to add the conversion tracking code to your site, typically a Thank You. Double check that everything is setup properly and be sure to monitor your conversions. You could even go through the process yourself by making a purchase on your site and checking that the conversion was tracked properly.
Conducting a comprehensive audit of your Google Ads account is incredibly beneficial and should be done at least once every six months. Remember to note down any changes you make so you can easily measure the performance of your campaign.
Author Bio

Oliver Wood
Digital Consultant , DigitalMonopoly
Oliver Wood is the founder of the largest SEO, Google Ads and Web Design and Development company in Western Australia.
.png)


